Buttons
On May 26, 2021, Discord added a new interaction called buttons. Instead of reactions, bots could now send buttons and users could use them to interact with bots. This opened up a whole new world of possibilities for bots. Soon after, developers made calculators, polls, and games like blackjack, UNO, and even Minecraft! Buttons provided a clear and easy to use interface for interacting with bots.
So, let's learn how you can add buttons to your bot!
Concept
Buttons weren't the only update to the interactions system in Discord. Discord also added Select Menus and Modal Dialogs, both of which work very similarly to buttons.
These UI elements reside in a "view". To learn more about views, please refer to the interactions page.
Usage Syntax
Let's see how to create a simple responsive button.
import discord

bot = discord.Bot() # Create a bot object

class MyView(discord.ui.View): # Create a class called MyView that subclasses discord.ui.View
    @discord.ui.button(label="Click me!", style=discord.ButtonStyle.primary, emoji="😎") # Create a button with the label "😎 Click me!" with color Blurple
    async def button_callback(self, button, interaction):
        await interaction.response.send_message("You clicked the button!") # Send a message when the button is clicked

@bot.slash_command() # Create a slash command
async def button(ctx):
    await ctx.respond("This is a button!", view=MyView()) # Send a message with our View class that contains the button

bot.run("TOKEN") # Run the bot
Using this command should return the following message:
As you can see, we create a class called MyView that subclasses
discord.ui.View.
Then, we add a function called button_callback to the MyView class with the decorator
discord.ui.button.
This decorator adds a button to a component. This function takes two arguments: the button that was
clicked and the interaction. These arguments are passed to the function when the button is clicked
by the module. We use the interaction.response.send_message
function to send a message to the channel where the interaction was sent.
Finally, we create a global slash command called button that sends the message, along with the view
that contains a button.
This is the basic syntax of creating a button. What you create with it is up to you. You can worry about making your button do amazing things, while Pycord handles the rest!
Button Styles
| Name | Usage | Color |
|---|---|---|
| Primary | discord.ButtonStyle.primary / discord.ButtonStyle.blurple | Blurple |
| Secondary | discord.ButtonStyle.secondary / discord.ButtonStyle.grey / discord.ButtonStyle.gray | Grey |
| Success | discord.ButtonStyle.success / discord.ButtonStyle.green | Green |
| Danger | discord.ButtonStyle.danger / discord.ButtonStyle.red | Red |
| Link | discord.ButtonStyle.link / discord.ButtonStyle.url | Grey |
Check out the discord.ButtonStyle class for more information.
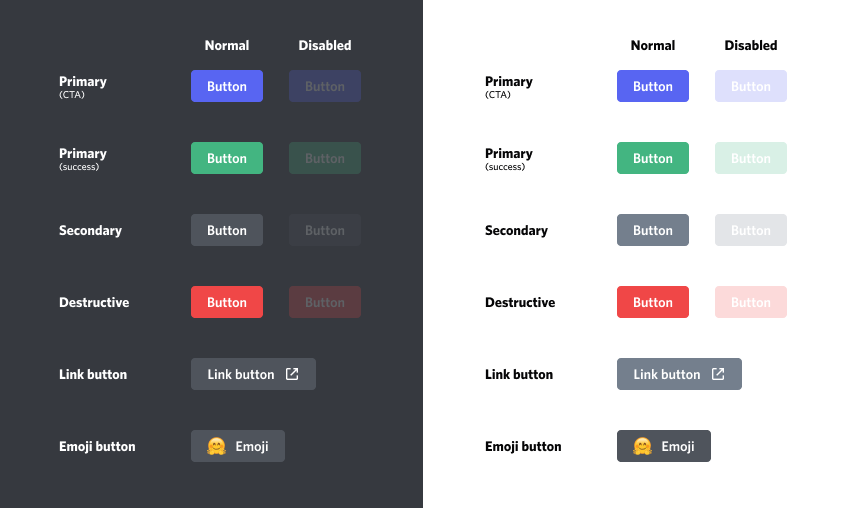
You can set a button's style by adding the style argument in the discord.ui.button decorator.
class MyView(discord.ui.View):
    @discord.ui.button(label="Click me!", style=discord.ButtonStyle.success)
    async def button_callback(self, button, interaction):
        await interaction.response.send_message("You clicked the button!")
Action Rows
We have discussed that Views can have 5 rows. Each row has 5 slots, and each button takes up 1 slot. So, how do we move the buttons to another row?
This can be done by specifying the row argument in the discord.ui.button
decorator.
row argumentThe row argument specifies the relative row this button belongs to. A Discord component can only have 5 rows. By default, items are arranged automatically into those 5 rows. If you’d like to control the relative positioning of the row then passing an index is advised. For example, row=1 will show up before row=2. Defaults to None, which is automatic ordering. The row number must be between 0 and 4 (i.e. zero indexed).
class MyView(discord.ui.View):
    @discord.ui.button(label="Button 1", row=0, style=discord.ButtonStyle.primary)
    async def first_button_callback(self, button, interaction):
        await interaction.response.send_message("You pressed me!")

    @discord.ui.button(label="Button 2", row=1, style=discord.ButtonStyle.primary)
    async def second_button_callback(self, button, interaction):
        await interaction.response.send_message("You pressed me!")
Disabling Buttons
Pre-Disabled Buttons
class MyView(discord.ui.View):
    @discord.ui.button(label="A button", style=discord.ButtonStyle.primary, disabled=True) # pass `disabled=True` to make the button pre-disabled
    async def button_callback(self, button, interaction):
        ...

@bot.command()
async def button(ctx):
    await ctx.send("Press the button!", view=MyView())
Disabling Buttons on Press
- Disabling a single component
- Disabling all the components of a view
class MyView(discord.ui.View):
  @discord.ui.button(label="A button", style=discord.ButtonStyle.primary)
  async def button_callback(self, button, interaction):
      button.disabled = True # set button.disabled to True to disable the button
      button.label = "No more pressing!" # change the button's label to something else
      await interaction.response.edit_message(view=self) # edit the message's view
class MyView(discord.ui.View):
    @discord.ui.button(emoji="😀", label="Button 1", style=discord.ButtonStyle.primary)
    async def button_callback(self, button, interaction):
        self.disable_all_items()
        await interaction.response.edit_message(view=self)

    @discord.ui.button(label="Button 2", style=discord.ButtonStyle.primary)
    async def second_button_callback(self, button, interaction):
        self.disable_all_items()
        await interaction.response.edit_message(view=self)
Timeouts
Sometimes, you want to have a button that is disabled after a certain amount of time. This is where timeouts come in.
- Specifying time when creating a view object
- Specifying the time when subclassing
class MyView(discord.ui.View):
    async def on_timeout(self):
        self.disable_all_items()
        await self.message.edit(content="You took too long! Disabled all the components.", view=self)

    @discord.ui.button()
    async def button_callback(self, button, interaction):
        ...

@bot.command()
async def button(ctx):
    await ctx.send("Press the button!", view=MyView(timeout=30))
class MyView(discord.ui.View):
    def __init__(self):
        super().__init__(timeout=10) # specify the timeout here

    async def on_timeout(self):
        self.disable_all_items()
        await self.message.edit(content="You took too long! Disabled all the components.", view=self)

    @discord.ui.button()
    async def button_callback(self, button, interaction):
        ...
Here, we disable all buttons and select menus in the view. Then, we edit the message to show that the timeout was reached.
If the on_timeout coroutine is not present, the components will simply stop working after the specified time.
Persistent Views
Sometimes, instead of a button that is disabled after a certain amount of time, you want to have a button that is always working.
Normally, when the bot goes offline, all of its buttons stop working. You will be able to see the buttons, but nothing will happen when you press them. This is a problem if you are trying to create a self-role system with buttons, for example. This is where persistent views come in.
Persistent views work forever. When the bot goes offline, the buttons will stop working. When the bot comes back online, however, the buttons will start working again.
In a Persistent View, the timeout must be set to None and all the children in the view must have a custom_id attribute set.
@bot.event
async def on_ready():
    bot.add_view(MyView()) # Registers a View for persistent listening

class MyView(discord.ui.View):
    def __init__(self):
        super().__init__(timeout=None) # timeout of the view must be set to None

    @discord.ui.button(label="A button", custom_id="button-1", style=discord.ButtonStyle.primary, emoji="😎") # the button has a custom_id set
    async def button_callback(self, button, interaction):
        await interaction.response.send_message("Button was pressed", ephemeral=True)

@bot.command()
async def button(ctx):
    await ctx.send(f"Press the button! View persistence status: {MyView.is_persistent(MyView())}", view=MyView())
FAQ
How many buttons can I have in a message?
Each message can have a maximum of 25 buttons. Views can have up to 5 rows, and each row has 5 slots. A button takes up one slot, while a select menu takes up all five slots.
Can I add more than one view to a message?
No. As a Discord limitation, you can only have one view per message.
Why are UI Components so confusing?
They cannot be simple like commands. This system makes them flexible and doesn't limit your imagination. There are loads of different ways you can use UI Components. For example, you could subclass Buttons or Select Menus and add them to a view using the view's add_item function.
UI Components aren't hard to use if you know Python. We recommend learning Object-Oriented Programming with Python.
What is OOP? What is subclassing?
OOP (object-oriented programming) is a programming paradigm that allows you to create objects that have
their own properties and methods. Almost everything in python is an object or a class. discord.Embed and discord.ui.View are both classes. When you use view = discord.ui.View() to create a view, you are actually creating an object of type discord.ui.View.
Subclassing is a Python OOP concept. It means that you can create a class that inherits from another class. In other words, the class that subclasses another class can inherit all the methods and attributes of that class.
We highly recommend you learn about basic Python concepts like classes and inheritance before you start learning Pycord.
Resources:
Do buttons need any special permissions?
No new permissions are needed for either the bot or the server to allow bots to use buttons.
Should I replace reactions with buttons for my bot?
That is up to you. Buttons do provide a cleaner interface for your bot and are easier to use.